Crochet Granny Square Bag
- Heather Corinne
- Jul 25, 2022
- 5 min read
Updated: Jul 3, 2023
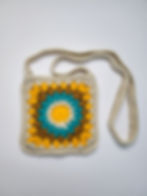
The Crochet Granny Square Bag is a free pattern here on my blog! This quick pattern uses a 'starburst' granny square to create a handmade, boho purse. Below you'll find the free pattern.

Pattern Design + Construction
The Crochet Granny Square Purse whips up quickly and makes the perfect handmade gift idea! This crochet pattern would also be great for scrap yarn since granny squares look their best with multiple colors.
The finished crochet boho purse measures 7 by 7 inches and consists of two starburst granny squares which are crocheted together with a border. We will also attach a cross body strap for our bag that is adjustable to your length of choice! I would classify this pattern as intermediate level due to the more advanced stitches required in the granny square.
Pin this Crochet Granny Square Bag Free Pattern to your crochet board on Pinterest so you can easily locate it later!

Yarn:
I'm using medium (4) worsted weight yarn for my Crochet Boho Purse design. I enjoy working with worsted weight yarn since it's versatile and wears well. You could easily substitute for another worsted weight yarn as long as the ounces per gram are similar.
For this tutorial and in the photos, I'm using the following yarn colors:
Red Heart Super Saver, Medium 4, 7 oz / 198 g, in the color Light Jasmine
Red Heart Super Saver, Medium 4, 7 oz / 198 g, in the color Saffron
Red Heart Super Saver, Medium 4, 7 oz / 198 g. in the color Jade
Yarn Bee Yarn ID, Medium 4, 5 oz / 252 yd in the color Oats
Yarn Bee Yarn Soft & Sleek, Medium 4, 5 oz / 232 yd in the color Tobacco

Additional Crochet Supplies:
If you make a purchase using these links, you're supporting this blogger at no additional cost to you. Thank you!
Size H (5mm) Crochet Hook - https://amzn.to/3IHorgE
Tapestry Needle / Yarn Needle - https://amzn.to/3zxppJo
Scissors - https://amzn.to/3Pvbetr
Stitch Markers - https://amzn.to/3bdJoiH

Stitches:
This pattern is written in US crochet terminology.
Chain
Magic Circle
Slip Stitch
SC - Single Crochet
HDC - Half Double Crochet
DC - Double Crochet
TC - Triple Crochet (also referred to as treble crochet)
Puff Stitch (additional details below)
Bobble Stitch (additional details below)
For stitches I don't use very often such as the puff stitch and bobble stitch, I always struggle to remember exactly how each is performed. To help with that, I've listed below the specific steps for the Puff Stitch and the Bobble Stitch in reference to how they will be used in this pattern.
Puff Stitch:
A puff stitch is three unfinished HDC in the same stitch.
All of the following into the same stitch:
We already have a loop on the hook (Loop Count 1)
Yarnover, insert hook, yarnover, pull up a loop (Loop Count 3)
Yarnover, insert hook, yarnover, pull up a loop (Loop Count 5)
Yarnover, insert hook, yarnover, pull up a loop (Loop Count 7)
Yarnover, pull through all 7 loops, chain 1
Bobble Stitch:
A bobble stitch is 4 unfinished DC in the same stitch.
All of the following into the same stitch:
We already have a loop on the hook (Loop Count 1)
Yarnover, insert hook, pull up a loop, yarnover, pull through two (Loop Count 2)
Yarnover, insert hook, pull up a loop, yarnover, pull through two (Loop Count 3)
Yarnover, insert hook, pull up a loop, yarnover, pull through two (Loop Count 4)
Yarnover, insert hook, pull up a loop, yarnover, pull through two (Loop Count 5)
Yarnover, pull through all 5 loops, chain 2
For the PDF printable, ad-free pattern: CLICK HERE
To pin this pattern on Pinterest for later: CLICK HERE
Crochet Granny Square Bag - Free Crochet Pattern

Starburst Granny Square (Make 2):
With the center color (color #1),
Round 1:
In a magic circle, chain 3, DC 15, pull tight (15 stitches [16 if you count chain 3])
Slip stitch into the 3rd chain of the chain 3 and switch to color #2.

Round 2:
Chain 3, puff stitch in each stitch around (16 stitches)
For the first puff stitch, go into the same stitch as the chain 3
Slip stitch into the 3rd chain of the chain 3 and switch to color #3.

Round 3:
Chain 3, bobble stitch into each space between the puffs from Round 2 (16 stitches)
For the first bobble stitch, go into the same space as the chain 3.
Slip stitch into the 3rd chain of the chain 3 and switch to color #4

Round 4:
We will continue working into the spaces from the previous round; brackets indicate all within one space. This will begin to create the square shape.
[Chain 3, 2 DC]
[2 TC, chain 2, 2 TC], [3 DC], [3 HDC], [3 DC]
[2 TC, chain 2, 2 TC], [3 DC], [3 HDC], [3 DC]
[2 TC, chain 2, 2 TC], [3 DC], [3 HDC], [3 DC]
[2 TC, chain 2, 2 TC], [3 DC], [3 HDC]
Slip stitch into the 3rd chain of the chain 3, switch to color #1.

Round 5:
We will continue working into the spaces from the previous round; brackets indicate all within one space. We are expanding the square shape.
[Chain 3, 2 HDC], [3 DC]
[2TC, chain 2, 2 TC], [3 DC], [3 HDC], [3 HDC], [3 DC]
[2TC, chain 2, 2 TC], [3 DC], [3 HDC], [3 HDC], [3 DC]
[2TC, chain 2, 2 TC], [3 DC], [3 HDC], [3 HDC], [3 DC]
[2TC, chain 2, 2 TC], [3 DC], [3 HDC]
Slip stitch into the 3rd chain of the chain 3, switch to color #2

Round 6:
We will continue working into the spaces from the previous round; brackets indicate all within one space. We are expanding the square shape.
[Chain 3, 2 HDC], [3 HDC], [3 DC]
[2TC, chain 2, 2 TC], [3 DC], [3 HDC], [3 HDC], [3 HDC], [3 DC]
[2TC, chain 2, 2 TC], [3 DC], [3 HDC], [3 HDC], [3 HDC], [3 DC]
[2TC, chain 2, 2 TC], [3 DC], [3 HDC], [3 HDC], [3 HDC], [3 DC]
[2TC, chain 2, 2 TC], [3 DC], [3 HDC]
Slip stitch into the 3rd chain of the chin 3, chain 1, tie off.
Weave in all ends and trim any excess yarn.

Assembly:
Line up both granny squares with the correct sides facing outward.
With Color #2, join to the top left side and begin single crocheting both squares together down the left side. We'll place one SC in each stitch.
To keep the nice corner shape: at each corner, you'll place the following in the space between the stitches [SC, chain 1, SC].
Continue to SC until you've reached the top right side.
Now we should have the purse base with three side joined together.

Top:
To clean up the top of the purse opening, we will continue to single crochet around except we will not be joining the two sides together. So we will chain 1, single crochet to the left across the top front side only. When we reach the end of the front side, we'll continue to single crochet across the back side.

When we get back to where we started, slip stitch, chain 1 and tie off with a long enough tail to weave in the end.
Strap:
With color #2,
Chain stitch the length you'd like your strap to be, plus a chain 1 (for mine, I chained 150 + 1 = 151).
Complete three rows of single crochet, tie off with a long tail.
Using the long tail, stitch the first side onto the purse using a tapestry needle.
Making sure the strap is not twisted, attach the other side (you'll need a new strand to attach this side).

I think the only thing that could elevate this design is to add a cloth liner inside the purse.


I'd love to see your creations! Tag me on Instagram @heathercorinne_ or Facebook @heathercorinnecrochets
Chat with you soon,

OTHER FREE PATTERNS:

(You're welcome to make and sell items using my patterns but do not use my pattern or pictures and claim them as your own. Clearly credit the design to me and provide a link back to my pattern. Personal Use Only. ©2022 Heather Corinne)
