Crochet Mini Jellyfish
- Heather Corinne
- Apr 11
- 3 min read
Updated: May 9
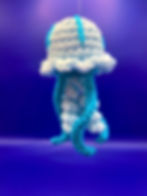
Enjoy my Free Crochet Pattern for a Mini Jellyfish! This pattern is great for amigurumi beginners and quick for crochet markets! Keep scrolling for the free pattern and video tutorial!

This post contains affiliate links.
Pattern Design + Construction:
This crochet Mini Jellyfish can also be adapted into an adorable bag charm or key chain. The bell, tentacles, and belly are crocheted separately then assembled using a yarn needle.
The Finished Mini Jellyfish Measures Approximately:
4.75 x 2.5 inches
You could easily make a larger jellyfish by increasing yarn weight and hook size.
Pin this Crochet Mini Jellyfish to your crochet board on Pinterest for later!

For the Etsy PDF printable pattern: CLICK HERE
To crochet this pattern on Ribblr: CLICK HERE
To pin this pattern on Pinterest: CLICK HERE
To follow along with the Video: CLICK HERE
Crochet Supplies:
If you make a purchase using my links, you're supporting this blogger at no additional cost to you. Thank you!
Worsted Weight (4) Yarn
Size G or 4mm Crochet Hook - https://amzn.to/3TVCtjH
Yarn Needle - https://amzn.to/2VWOFb4
Scissors - https://amzn.to/3fjGu2o
Stitch Markers - https://amzn.to/3CRYkQU
Safety Eyes (optional) - https://amzn.to/3HOI0Y1
Embroidery Floss (optional) - https://amzn.to/4n1rILF
Stuffing - https://amzn.to/37QUE3j
Stitches:
This pattern is written in US crochet terminology.
Chain
Magic Circle (Tutorial)
SC - Single Crochet
HDC - Half Double Crochet
DC - Double Crochet
INC - Single Crochet Increase
FLO - Front Loop Only
Slip Stitch
* - Repeat sequence until the end of the round
Crochet Mini Jellyfish - Free Pattern
Yarn Color Key
Color 1: Bell and Curly Tentacles
Color 2: Belly and Skinny Tentacles
Skinny Tentacles (Make 4)
With Color 2, Chain 21
Row 1: Slip stitch in each stitch (20)
Chain 1, tie off with a short tail (enough to tie to the belly)

Curly Tentacles
With Color 1, Chain 18
Row 1: INC in each stitch except the last one (32)
We will repeat 2 more times without tying off
Chain 18
Row 2: INC in each stitch except the last one (32)
Chain 18
Row 3: INC in each stitch except the last one (32)
Chain 1, tie off with a long tail

Belly:
With Color 2
Round 1: In a Magic Circle, SC 6, pull tight (6)
Round 2: INC in each stitch (12)
Round 3: INC, SC in the next stitch (18)
Round 4: INC, SC in the next 2 stitches (24)
Chain 1, tie off with a long tail

Bell / Umbrella
With Color 1
Round 1: In a Magic Circle, SC 6, pull tight (6)
Round 2: INC in each stitch (12)
Round 3: INC, SC in the next stitch (18)
Round 4: INC, SC in the next 2 stitches (24)
Rounds 5-8: SC in each (24)
Round 9: FLO [HDC, DC, HDC in the first stitch], slip stitch in the next stitch* (48)
Chain 1, tie off and weave in.
At this point, you can add a face and/or stripes with embroidery floss or yarn.

Assembly:
Using a yarn needle and the long tail on the curly tentacles, attach them around Round 1 of the belly. Trim any excess yarn.

Using the tails on the skinny tentacles, attach them evenly spaced around the curly tentacles in between Rounds 3 and 4 of the belly.
Trim any excess yarn.


Add stuffing to the bell. Using a yarn needle and the long tail on the belly, stitch the belly onto the bell using the inside stitches from Round 9 of the bell. Add any additional stuffing right before finishing the attachment. Tie off and trim any excess yarn.


And here we have an adorable Crochet Mini Jellyfish! Feel free to get creative with the colors, the face, and the bag charm variations. These little ocean critters are perfect as rear-view mirror car hangers, backpack buddies, or ornaments.

Bag Charm/Keychain/Ornament Option:
Using the yarn color of your choice,
Place a slip knot on your hook and join on the back side of Round 1 with a slip stitch.
Chain 40
Slip stitch again into the stitch where you began.
Chain 1, tie off and weave in the ends.
You can adjust the size of the hanger by increasing or decreasing the chain stitches.

I'd love to see your creations! Tag me on Instagram @heathercorinne_
Chat with you soon,

MORE FREE PATTERNS:

(You're welcome to make and sell items using my patterns but do not use my pattern or pictures and claim them as your own. Clearly credit the design to me and provide a link back to my pattern. Personal Use Only. ©2026 Heather Corinne)
